How To Read Load Tables
To select size of diamond safety grating, determine load, clear span and deflection requirements. Having this information, select from load tables the appropriate plank to meet job requirements. Example: Clear span of 4’-0”, concentrated load requirement of 300 lbs. at 0.25” maximum deflection.
Select from the tables following:
For 8-diamond, 183/4” wide, 21/2” channel, 12 gauge steel which carries a load of 416 lbs. at a 0.18” deflection. This is one size to do the job. Other sizes will carry more load if necessary. For more economical selection, choose the greatest width that will support the load consistent with job requirements and choose deeper channels rather than heavier steel gauges. Diamond safety grating will generally carry the same concentrated load, tabulated in lbs. at midspan, for a given span, material gauge and channel height, regardless of width. (See “How load tables were prepared” described below.) The uniform load tables are tabulated in lbs./sq.ft., which accounts for the difference in load capacity shown for various widths. Deflection is in inches.
How Load Tables Were Prepared
The values shown in the following tables are based on actual load tests conducted in accordance with the provisions of the AISI Specification for the Design of Cold-Formed Steel Structural Members, 1986 Edition. To help ensure the safety of the tabulated loads, two aspects of diamond safety grating must be considered.
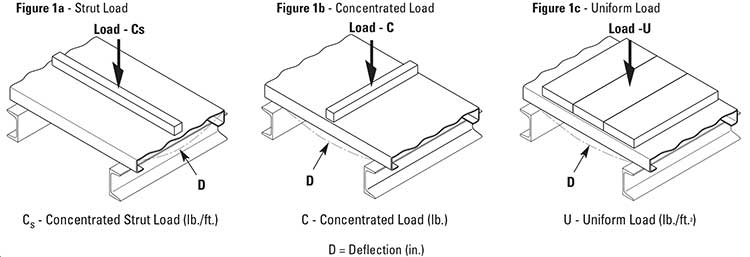
The first consideration is transverse bending in the grating surface, which is referred to as “strut flexure”. This occurs when the grating is loaded with either a uniform load or a mid-width concentrated load, and the “struts” (grating surface) deflect relative to the side channels. To determine the allowable strut loads, samples of each grating material and thickness were tested for each plank width. (See Figure 1a below and 2a on the following page). The data resulting from these tests was used to prepare “strut loading” tables, which give allowable loads and deflections considering strut flexure only. These allowable strut loads, along with the results of additional tests performed on 8- and 10-Diamond grating, have been incorporated in the Product Selection/Design Tables on pages 6 through 17.
The second aspect of diamond safety grating strength is channel flexure. This occurs when the channels at mid-span of the plank deflect relative to support points. To verify the performance of the side channels, samples were loaded with concentrated and uniform loads at different spans (see Figures 1b/2b and 1c/2c). To approximate the most severe condition, there were no attachments between the channels and the supports. In cases where spans are shorter, channels deeper and planks wider, strut flexure becomes more critical.
2-, 3-, 4- and 5-Diamond Allowable Load and Deflection Tables
Since 2- through 5-Diamond planks are relatively narrow (less than 1 foot wide), it can be assumed that both side channels effectively support the concentrated load and that the grating surface deflection is negligible. Based upon these assumption, the values in the following Design Tables for 2-Diamond through 5-Diamond have been determined.
Allowable Uniform Load (U)
Values indicated in the rows adjacent to “U” are the lowest of the (1) maximum allowable uniform loads considering channel flexure and (2) maximum grating surface flexure.
Deflection Corresponding to “U”
Deflection values are indicated below the uniform loads and are in the mid-span side channel deflections for the planks carrying the allowable uniform loads (Figure 1c and 2c).
Allowable Concentrated Load (C)
Values indicated in the rows labeled “C” are the lowest of the (1) maximum allowable concentrated load considering channel flexure (Figure 1b and 2b), with both channels effective, and (2) the maximum allowable strut load (Cs) for a 1 foot long sample (Figure 1a and 2a).
Deflection Corresponding to “C”
Deflection values indicated below “C” values in the tables are the mid-span, side channel deflections produced when the allowable concentrated load is placed at mid-span. If grating surface deflection should be considered when selecting a product to meet a particular specification, then the deflection of the mid-width of the grating, relative to the side channels, can be calculated using both the data in the Strut Loading Tables (pages 6 -17) and the Load/Deflection Conversion formula on top of following page.
Load data based on yield strength of 33,000 psi for steel, 23,000 psi for aluminum, 35,000 psi for Type 304 stainless steel, and 30,000 psi for Type 316L stainless steel.
Load/Deflection Conversion Formulas
In the elastic range, deflection is proportional to the applied load for both uniform and concentrated loads. This relationship can be used to determine the deflection that any load which is less than the allowable load will produce, as shown in Example A. Also, if desired, the load which will produce a specific deflection can also be determined if the load is in the elastic range as illustrated in Example B.
Example A
What deflection will a 300 lb. concentrated load produce on a plank (catalog number 103012) spanning 5”-0”?
See page 16 for item 103012 at a span = 5’-0” C = 480 lb. D = D @ 300 lb. = 0.26”/480 lb. x 300 lb. = 0.16”
Example B
If a plank (catalog number 103012) is spanning 6’-0”, what concentrated load will produce a 1/4” deflection?
See page 16 for item 103012 at a span = 6’-0” C = 400 lb. D = 0.26” C @ 1/4” = 400 lb./0.26” x 0.25” = 385 lb.
8- and 10-Diamond Allowable Load and Deflection Tables
As width increases, grating strut flexure becomes much moreimportant. 8-Diamond and 10-Diamond products are wide enough to require a change in the assumptions used to prepare the 2-Diamond through 5-Diamond Product Selection/Design Tables. No longer will it be assumed that both side channels are equally effective in supporting a concentrated load. In fact, to provide a high level of safety, one side channel will be required to carry 100% of a concentrated load.
Also strut deflection for 8-Diamond and 10-Diamond products may be significant. The most critical case occurs when a concentrated load is located at mid-span and mid-width. To determine how the struts perform under this loading, 3 foot long samples of each material and thickness were tested. For these tests the side channels were continuously supported and loads were applied using a 1 foot long and 1 inch wide bar placed parallel to the side channels at mid-width and at the longitudinal center. Results of these tests, included in the 8-Diamond and 10-Diamond Product Design Tables, proved the performance of these materials when a concentrated load is applied at mid-span and mid-width. If a concentrated load is to be applied at mid-width at the end of a plank, consult the Strut Loading Tables (pages 6-17). The following values have been tabulated for 8-Diamond and 10-Diamond grating:
Allowable Uniform Load (U)
Values are given in the rows labeled “U” and are the lowest of the (1) maximum allowable uniform loads considering channel flexure, and (2) maximum grating surface flexure.
Deflection Corresponding to “U”
Deflection values appear in the rows labeled “D”, below the “U” values, and are maximum deflections the allowable uniform loads would produce. Maximum deflections will occur at mid-span and mid-width and will be the sum of side channel and grating surface deflections (Figure 1c and 2c).
Allowable Concentrated Load (C)
Values tabulated in the rows labeled “C” are the lowest of the (1) maximum allowable concentrated load considering side channel flexure (with one side channel supporting the entire load — Figure 2b, and (2) the maximum allowable strut flexure (Figure 2a).
Deflection Corresponding to “C”
Deflection values are indicated below “C” values in the table and are deflections the allowable concentrated load will produce at mid-span and at the mid-width. The deflection is the sum of side channel and grating surface deflections.
